How to Draw a Perfect Circle Sai
It's Okay Non to Describe Perfect Lines at the First Attempt!
Do you feel pressured to describe your lines perfectly at the first try?
At that place's no need to feel that way!
Fifty-fifty professional illustrators sometimes redraw their lines over and over to make beautiful line art.
Be fix to undo (Ctrl+z), and draw without worry
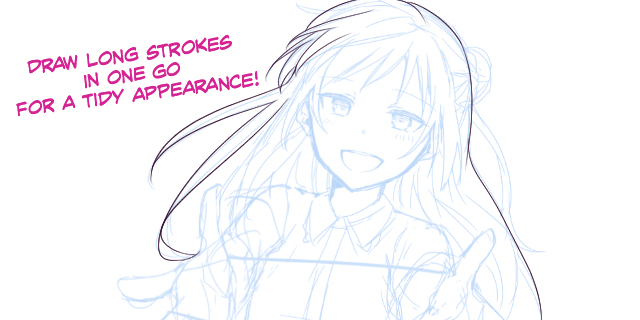
This is for when you want to draw long, relaxed lines. It's especially effective whendrawing shine hair and body outlines.
Don't be afraid to make mistakes, and go on undoing your lines until you're satisfied with them!
Past drawing your strokes from joint to joint such as shoulders to elbows and elbows to wrists, you tin brand directly, supple line art that catches the feature of each body part.
Trace and so tidy up

You lot don't necessarily have to draw neat lines in a single stroke. You tin can use the eraser tool to tidy up your line after cartoon the same line a few times. If you think you lot've drawn a good draft from the start, yous can also re-create information technology and use the same method to tidy it up into your line fine art.
Apply Different Thicknesses for Pen Tools
Are yous using the aforementioned thickness for all the lines in your line fine art?
Thick lines for outlines and the foreground
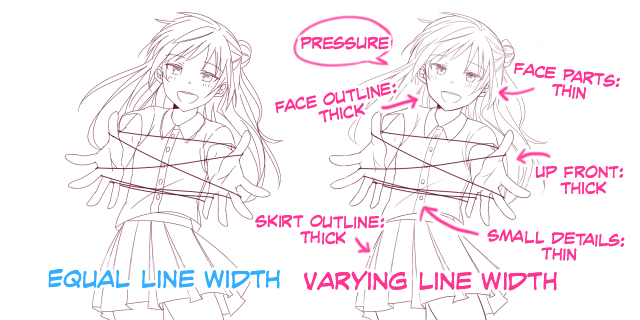
Use thick lines for parts that you want to bear witness more, such as the hands in the above example prototype. This technique will allow you to give your line personality and a iii-dimensional experience without using colors and shading.
Thin lines for the inside of pupils and nails
Utilize a thinner line for drawing the wrinkles on clothing, the within of pupils, and nails.
Vary line thickness for clothing wrinkles depending on the cloth
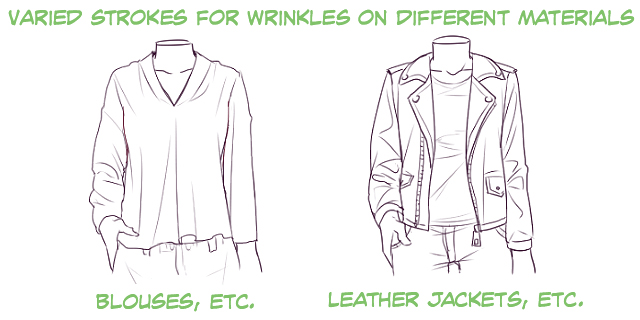
Go along in heed the material an article of clothing is made out of when drawing its wrinkles.
Use thin, light lines for soft materials like T-shirts and blouses. For clothes with harder materials, such as leather jackets and suits, use thick brushes and draw firm lines. This technique allows you to utilise line art to express what your characters are wearing.
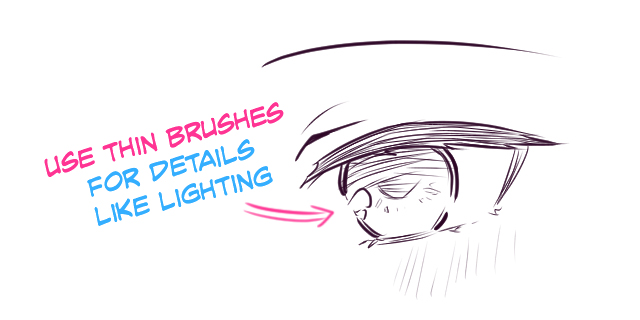
Use Darker Lines for Shadows and Intersections
When coloring illustrations, you'd normally use low-cal colors for places where light would shine, and dark colors for shadows. The same goes for line art. Use thinner pens for light areas, and thicker pens for shadows. This will likewise assistance in evoking a three-dimensional expect.

When using dip pens, places with intersecting lines become black because the ink tends to pool in those areas. If you darken the intersections in digital fine art as well, you can give your line fine art more than of a pen-and-paper await to it.
Stabilization
If you don't similar your strokes for some reason, y'all can try changing the Stabilization of your castor tool.
Stabilization is a characteristic that will automatically set the wobble in your line as yous draw. The higher the value, the smoother the line. This choice gives a more digital feel to your work compared to lower values.

However, the software may lag from setting the value as well high.
Values for correction vary by pen pressure, preferred pen tablet, and by person, so it's all-time to experiment and find your preferred value.
Clip Studio Paint, MediBang Paint, Pigment Tool SAI and GIMPall take stabilization features. If you lot employAdobe Photoshop CC, you tin can go a similar consequence using a setting called Smoothness.
Describe Using Vectors
Many of the images that you run across on computers are called raster images. Raster Images are images made up of a group of pixels. If you lot zoom in, you tin can encounter each individual pixel. They tin express complex gradients and are easy to edit, however, doing and then degrades them. Epitome quality is likewise lost upon scaled them upward.
On the other mitt, vector images don't degrade when scaled upwards, and then yous can edit them however you like even afterwards yous're done with your work. This is because a vector image is fabricated up of lines that connect ii coordinates.
One popular software that can make vector images isAdobe Illustrator. You can too employ vector layers in Clip Studio Pigment. Vector layers create dots called command points on lines. These allow you to describe vector images. You lot can likewise edit control points and lines as y'all similar after drawing them.
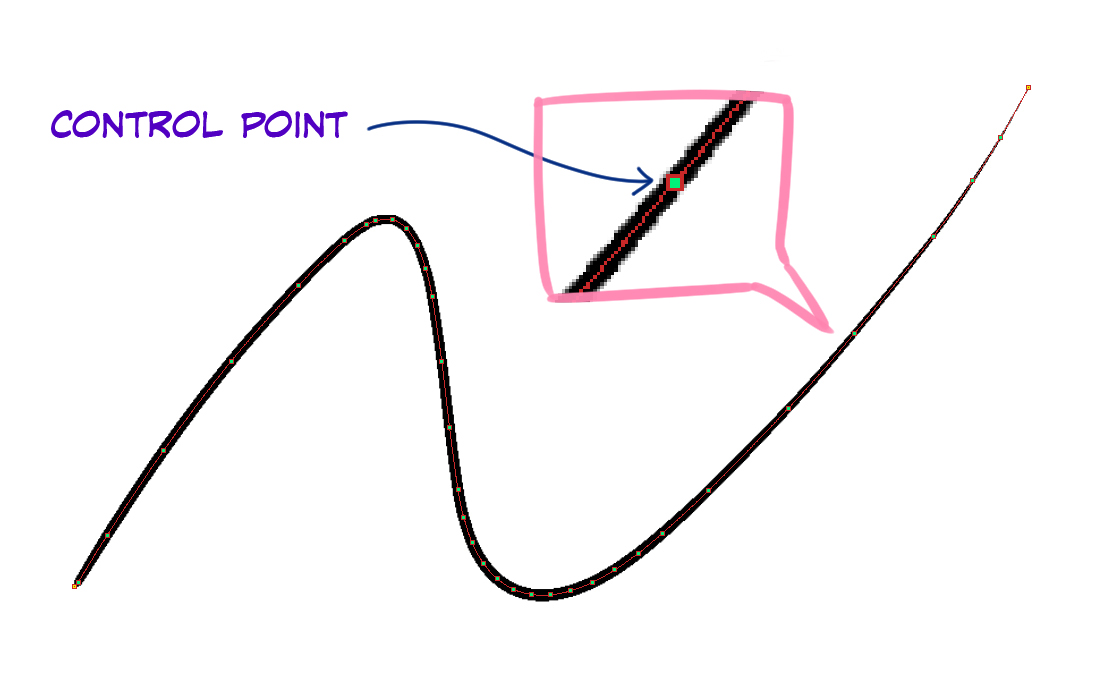
Vectors are useful for cartoon line art since you tin can easily change their thickness, edit curves, and delete equally needed.
You can also utilize vector layers to erase overextended lines!
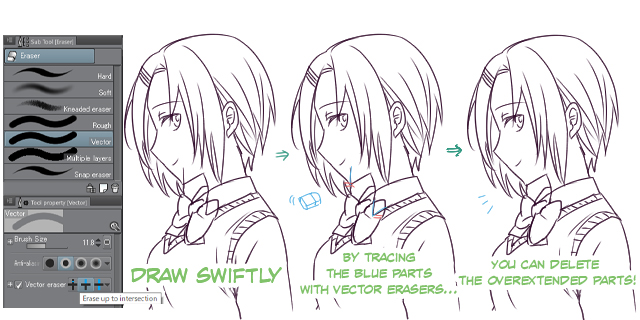
With raster layers, you might erase important lines when y'all want to erase unneeded parts of the line. Still, if you use the Vector Eraser tool in Prune Studio Paint, all yous take to do is describe over the unneeded part of line to erase it.
This allows you to depict lines without worrying too much about overextending or crossing them. This feature specially effective when drawing pilus.
As a veteran illustrator, I used to call up vector layers were complex and difficult every bit well. Notwithstanding, once I started using them, I realized that they weren't too different from normal, raster layers except that I could adapt my lines as necessary. Prune Studio Paint's vector eraser tool is actually convenient! If you're new to vectors, I highly recommend giving it a endeavour!
Click here for the Prune Studio Pigment PRO/EX trial version
Rotate the Canvas
When yous're drawing with pen and paper, yous naturally rotate the paper so that you can draw more hands. You tin rotate the canvas in digital fine art as well! If you feel like a item stroke is too difficult to draw, try rotating the canvas to get a better bending.
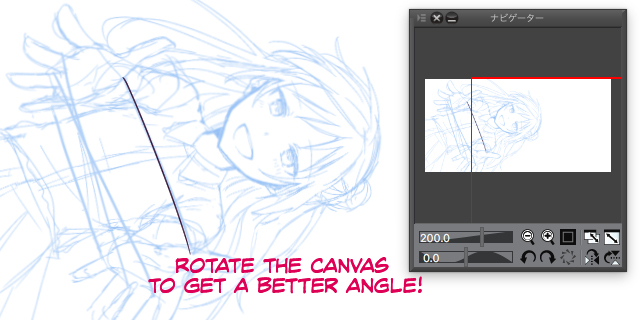
Information technology's easier to draw from top to bottom or left to right (if y'all're right-handed: right to left if you lot're left-handed). On the other hand, drawing from lesser to top or right to left (left to right if you're left-handed) is comparatively hard.
If yous're drawing on a smartphone or tablet PC, information technology's much easier to rotate the device to get a better angle to overcome this.
Other Tips:
Place a piece of paper on the pen tablet!
There will be more friction betwixt the pen tablet and the pen, so if you're used to drawing with pencils or dipped pens, this might assistance you describe better. However, keep in mind that the friction will likewise wear down your pen.
Pen Tablet and Monitor Settings
If y'all feel that none of the above steps are working for you, perhaps it'due south fourth dimension to recheck your settings for the pen tablet and monitor.
one. Place your pen tablet directly in front of the screen!
Quite uncomplicated, yet quite important! Always place your pen tablet straight in front of the screen. Even if you lot think it'south in the right place, your elbow might move it around when you're cartoon. If you feel any discomfort, always bank check the position of the pen tablet.
2. Prepare the drawing area of the pen tablet to the attribute ratio of the monitor.
If the monitor's attribute ratio is sixteen:9, then the drawing area of your pen tablet should also exist 16:9. If the pen tablet is also big and your strokes become besides long to draw, you should shrink the cartoon area while keeping the aforementioned aspect ratio. This will brand your strokes smaller and tin brand it easier to depict.
The primal to drawing cute line art is to find the drawing style that suits you the most!
Written by: Mirin Ichiyaboshi (いちやぼし みりん)Illustration: Kaisake (界さけ)
Created by: Sideranch Inc.
douglasalaire1937.blogspot.com
Source: https://www.clipstudio.net/how-to-draw/archives/155333
0 Response to "How to Draw a Perfect Circle Sai"
Post a Comment